 October snow, I NEVER would have thought it could be so destructive. I hope all of you are warm and safe, despite the chaos!
**Parents, there is a bit of preparation that will need to be done before class, so please make sure to read the instructions for creating grid lines at the bottom of the supply list.**
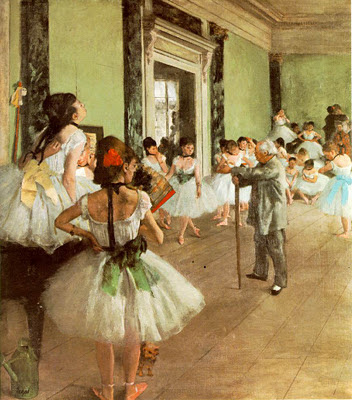
Our artist for the month of November is Degas. He is famous for his work with dancers, and I know many of you will recognize the picture below. Please print it out and place it in a location that your family will view often.
Edgar Degas
(Pronounced: Deh-GAS)
French
1834-1917

The Dancing Class
c.1873-1875
Musee d’Orsay, Paris
For a printable image, click here
Supplies to bring for this month’s class:
- One 8 1/2 x 11″ pale pastel sheet of construction paper or copy paper, your choice *MARKED WITH GRID LINES* (instructions below)
- One 9″ x 12″ sheet of black construction paper
- Two pieces of scrap paper
- 2 tissues (without lotion) per student
- Black crayon, preferably with a decent tip
- Colored chalk
- Pencil WITH an eraser
- Glue stick
- Optional: paper towels to clean dusty hands (I often suggest baby wipes for clean up, but the moisture will cause smears on this project so paper towels are a better choice)
- Optional: Operation Christmas Child shoebox gifts for underprivileged children. If you choose to participate, you can find more information about how to fill your box at:Samaritan’sPurse.org
**As I mentioned before, there is a bit of prep work that might frustrate the youngest students, so rather than holding everyone up with a lesson in fractions, I am asking that parents help me out. Please have this prepared before class:
You will need scissors, a ruler, and a pencil in addition to the paper mentioned above in order to prepare your child’s paper.First, cut both the black and pastel paper to size.Next you will need to mark grid lines on the pastel paper. Simply use a ruler to lightly mark the top and bottom of your pastel paper into fourths in each direction (at 2 1/8″, 4 1/4″, and 6 3/8″ along the short sides, and at 2 3/4″, 5 1/2″, and 8 1/4″ on the long sides), and then VERY LIGHTLY connect the dots with your pencil and ruler. We will need to erase these marks later, so please do not use pen, fold the paper, or bear down on the pencil.You should have 16 equal rectangles when you are done. If you have trouble visualizing what I need the final grid to look like, just watch this video. The paper he folds results in exactly 16 equal rectangles (DO NOT FOLD your paper).
Please e-mail me if you have any questions.
See you Tuesday, November 8th at 6:30!

